基于ubuntu22.04系统下“人脸替换”项目roop环境搭建与测试
乐果 发表于 2024 年 03 月 18 日 标签:ubuntuai
有了英伟达显卡终于可以作一些开源Ai项目的研究测试了。
今天准备对大名鼎鼎的 roop (视频人脸替换)项目做一下效果测试。
环境搭建
首先要安装 Anaconda:安装笔记
为了 python的依赖下载更快,配置国内更新源:
conda config --add channels https://mirrors.tuna.tsinghua.edu.cn/anaconda/pkgs/main
conda config --add channels https://mirrors.tuna.tsinghua.edu.cn/anaconda/pkgs/free
conda config --add channels https://mirrors.tuna.tsinghua.edu.cn/anaconda/pkgs/r
conda config --add channels https://mirrors.tuna.tsinghua.edu.cn/anaconda/pkgs/pro
conda config --add channels https://mirrors.tuna.tsinghua.edu.cn/anaconda/pkgs/msys2
conda config --set show_channel_urls yes
查看配置:
$ conda config --show channels
channels:
  - https://mirrors.tuna.tsinghua.edu.cn/anaconda/pkgs/msys2
  - https://mirrors.tuna.tsinghua.edu.cn/anaconda/pkgs/pro
  - https://mirrors.tuna.tsinghua.edu.cn/anaconda/pkgs/r
  - https://mirrors.tuna.tsinghua.edu.cn/anaconda/pkgs/free
  - https://mirrors.tuna.tsinghua.edu.cn/anaconda/pkgs/main
  - defaults
更新一下:
conda upgrade --all
下载roop项目源码并安装依赖
下载:
$ git clone https://github.com/s0md3v/roop.git
conda 创建新的环境:
$ conda create --name roop python=3.10
此时,在当前终端是无法切换到 roop 环境下,可以重新开启一个终端并切换到 roop 环境:
$ conda activate roop
安装 roop 项目依赖包:
conda install pytorch==2.0.0 torchvision==0.15.0 torchaudio==2.0.0 pytorch-cuda=11.7 -c pytorch -c nvidia
pip install -r requirements.txt
安装 onnxruntime-gpu 推理库:
pip install -i https://pypi.tuna.tsinghua.edu.cn/simple onnxruntime-gpu
推理库很大,下载比较耗时,耐心等待。。。
可能会遇到的问题
问题1:
      gcc: fatal error: cannot execute ‘cc1plus’: execvp: 没有那个文件或目录
      compilation terminated.
      error: command '/usr/bin/gcc' failed with exit code 1
      [end of output]

  note: This error originates from a subprocess, and is likely not a problem with pip.
  ERROR: Failed building wheel for insightface
Failed to build insightface
ERROR: Could not build wheels for insightface, which is required to install pyproject.toml-based projects
这种可能是 gcc 与 g++ 版本不一致导致的,比如我之前安装显卡驱动时,将 gcc 升级到了12版本,但 g++ 并没有升级。
查看 gcc 与 g++ 版本即可发现两个版本果然不一致:
$ g++ --version
g++ (Ubuntu 11.4.0-1ubuntu1~22.04) 11.4.0
Copyright (C) 2021 Free Software Foundation, Inc.
This is free software; see the source for copying conditions.  There is NO
warranty; not even for MERCHANTABILITY or FITNESS FOR A PARTICULAR PURPOSE.

$ gcc --version
gcc (Ubuntu 12.3.0-1ubuntu1~22.04) 12.3.0
Copyright (C) 2022 Free Software Foundation, Inc.
This is free software; see the source for copying conditions.  There is NO
warranty; not even for MERCHANTABILITY or FITNESS FOR A PARTICULAR PURPOSE.
也将 g++ 版本升级到12:
$ sudo apt-get install g++-12
$ cd /usr/bin
$ sudo rm g++
$ sudo ln -s g++-12 g++

$ g++ --version
g++ (Ubuntu 12.3.0-1ubuntu1~22.04) 12.3.0
Copyright (C) 2022 Free Software Foundation, Inc.
This is free software; see the source for copying conditions.  There is NO
warranty; not even for MERCHANTABILITY or FITNESS FOR A PARTICULAR PURPOSE.
问题2:
ERROR: pip's dependency resolver does not currently take into account all the packages that are installed. This behaviour is the source of the following dependency conflicts.
triton 2.0.0 requires cmake, which is not installed.
triton 2.0.0 requires lit, which is not installed.
缺少 cmake 和 lit 依赖,安装它:
pip install -i https://pypi.tuna.tsinghua.edu.cn/simple lit
pip install -i https://pypi.tuna.tsinghua.edu.cn/simple cmake
问题3:
例如:
python run.py -s 1.png -t a.mp4 -o /home/xiao/work/py/aa.mp4 --output-video-encoder libx264 --execution-provider cuda
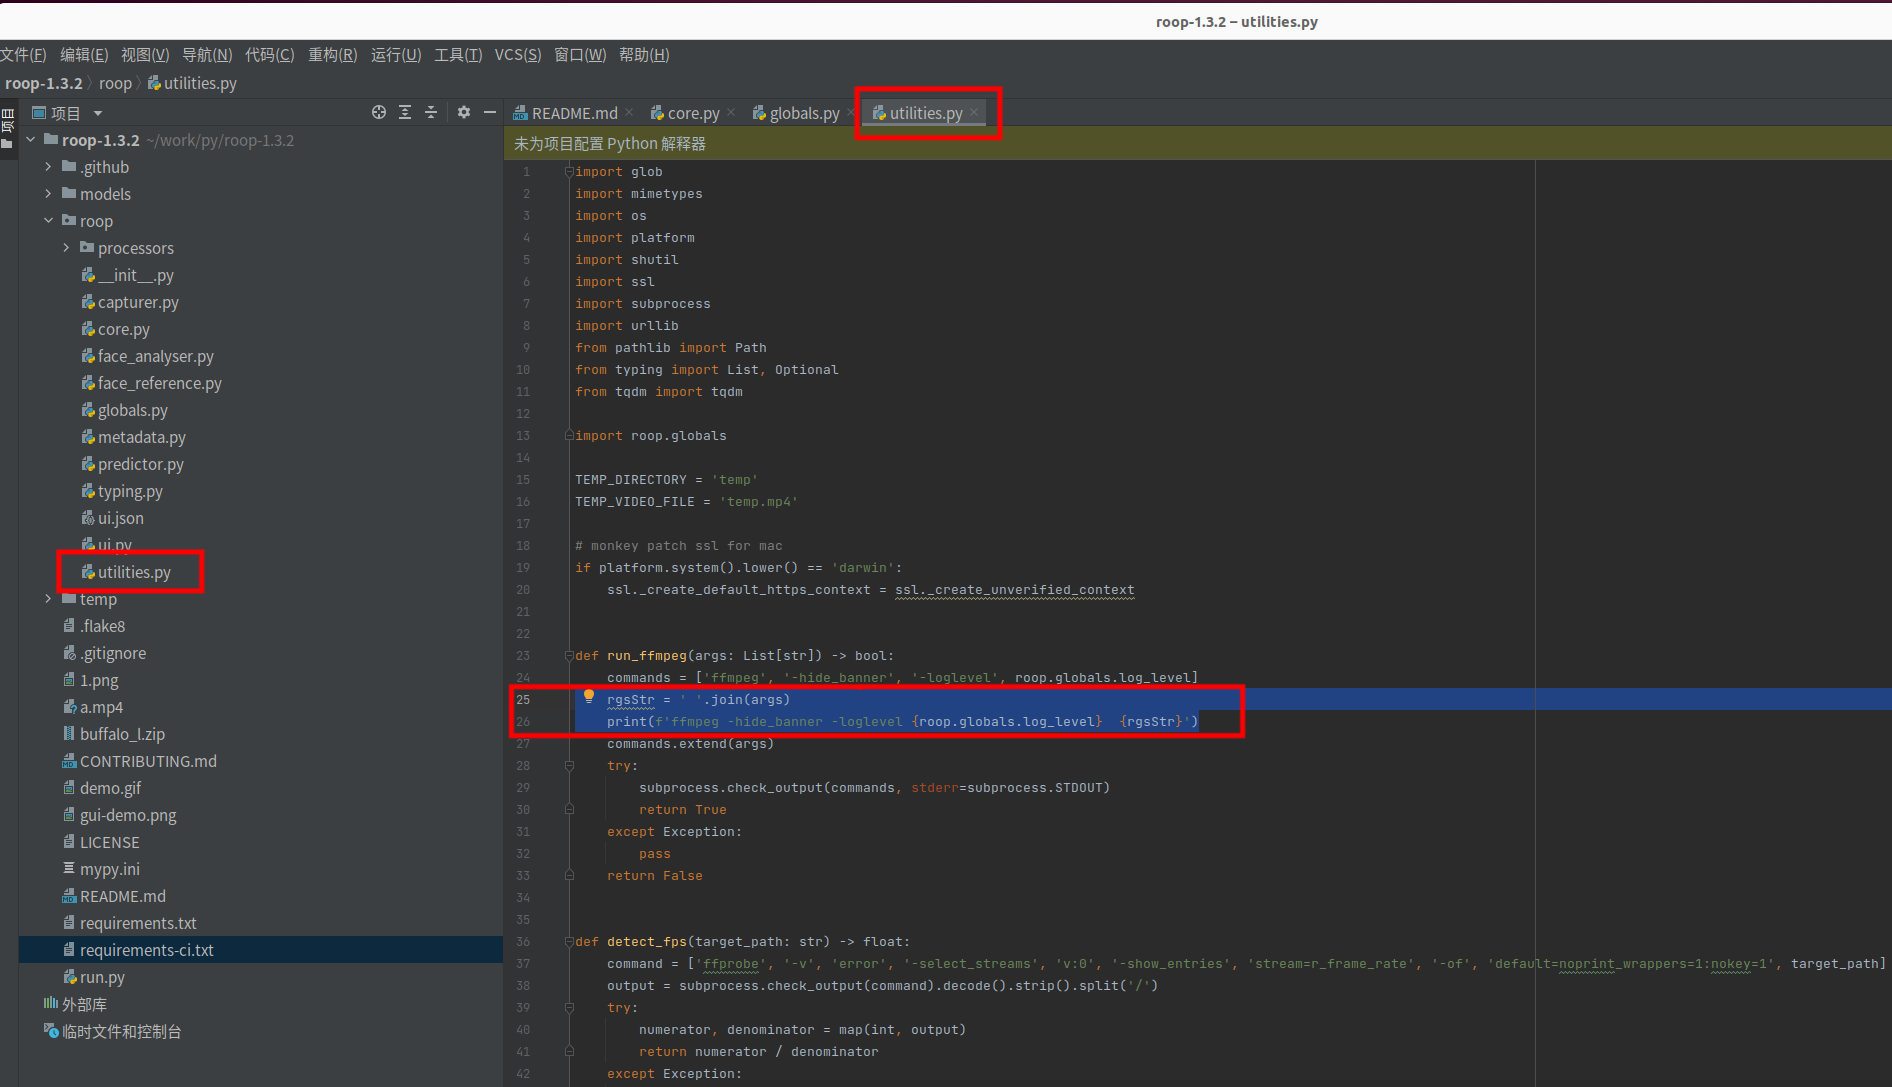
运行成功了,但没有输出视频(找不到输出的视频),原因很可能是因为 ffmpeg 命令报错了,为了验证一下,修改 roop/utilities.py 代码:
def run_ffmpeg(args: List[str]) -> bool:
    commands = ['ffmpeg', '-hide_banner', '-loglevel', roop.globals.log_level]
    #增加如下两行代码
    rgsStr = ' '.join(args)
    print(f'ffmpeg -hide_banner -loglevel {roop.globals.log_level}  {rgsStr}')
    #增加代码结束
    commands.extend(args)
    try:
        subprocess.check_output(commands, stderr=subprocess.STDOUT)
        return True
    except Exception:
        pass
    return False
如图所示:
重新运行,即会打印出 ffmpeg 视频转换命令:
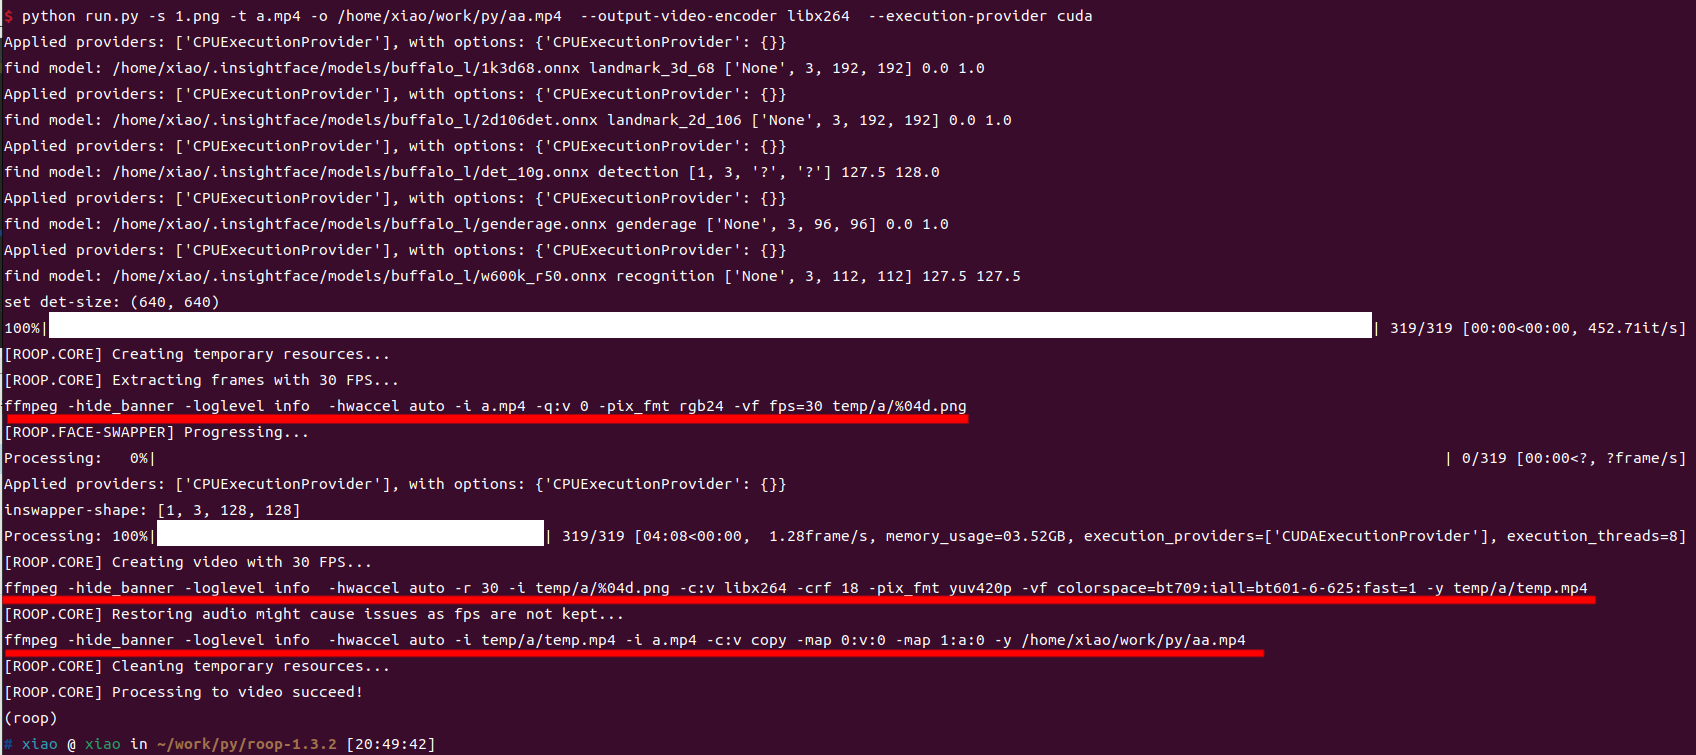
如上图所示,有三条 ffmpeg 命令,复制第二条在当前 conda 终端下执行:
$ ffmpeg -hide_banner -loglevel info  -hwaccel auto -r 30 -i temp/a/%04d.png -c:v libx264 -crf 18 -pix_fmt yuv420p -vf colorspace=bt709:iall=bt601-6-625:fast=1 -y temp/a/temp.mp4
# 结果果然报错
Unrecognized option 'crf'.
Error splitting the argument list: Option not found
如下图:

所以验证猜想正确!
但发现把上面 ffmpeg 命令放在其他新开终端,不要切换到当前 conda 环境下执行并不报错,难道是 ffmpeg 包在当前 conda 环境下版本或依赖有问题?
为了进一步验证,分别在两个终端查看 ffmpeg 版本,发现果然不一样。
那问题查明原因就好办了,在当前 conda 环境下重新安装 ffmpeg:
conda uninstall ffmpeg
conda install -c conda-forge ffmpeg
重新安装 ffmpeg 后问题解决。
cuda开启
上面能正常运行后,发现 cpu 被打满,怀疑没用上 gup 。
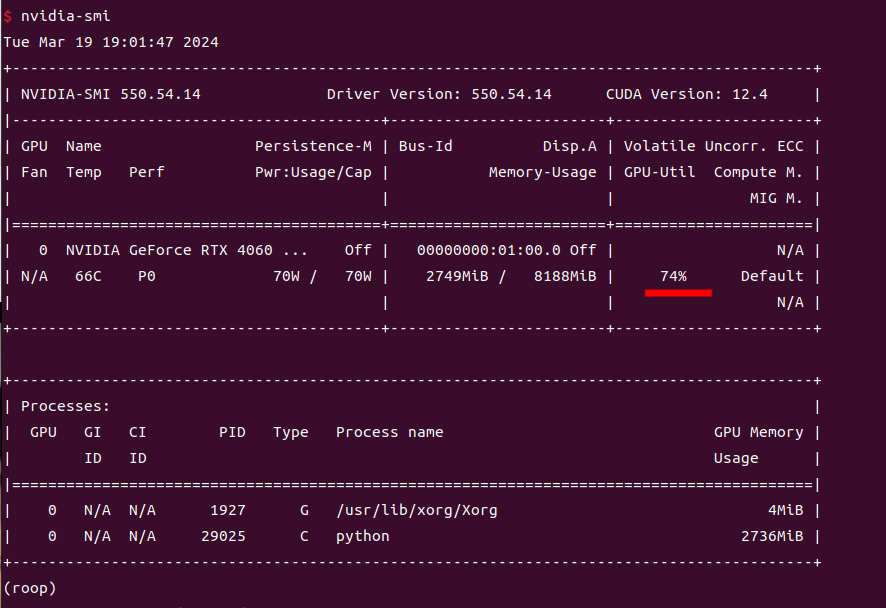
用 nvidia-smi 命令查看gpu使用情况:
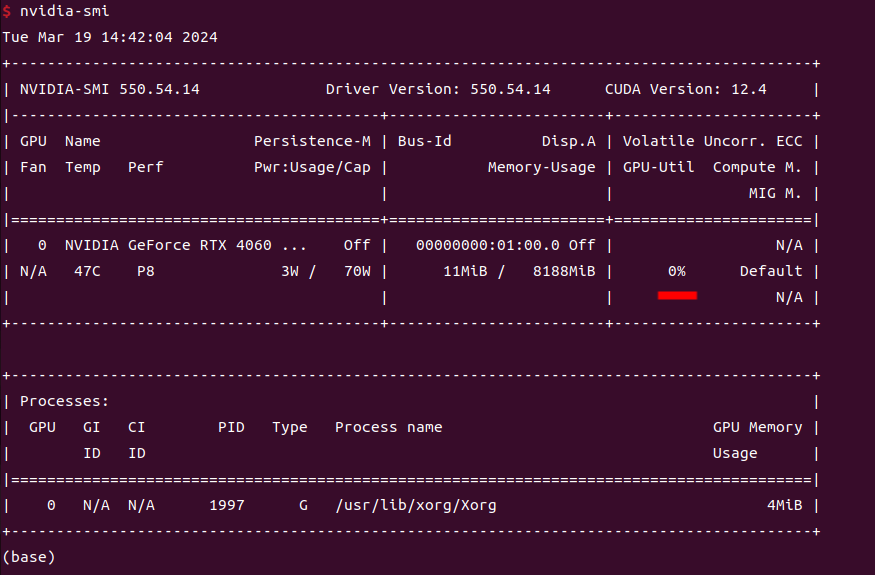
查找roop仓库的官方文档发现,需要安装cuda驱动。
根据文档去英伟达官方下载:https://developer.nvidia.com/cuda-11-8-0-download-archive
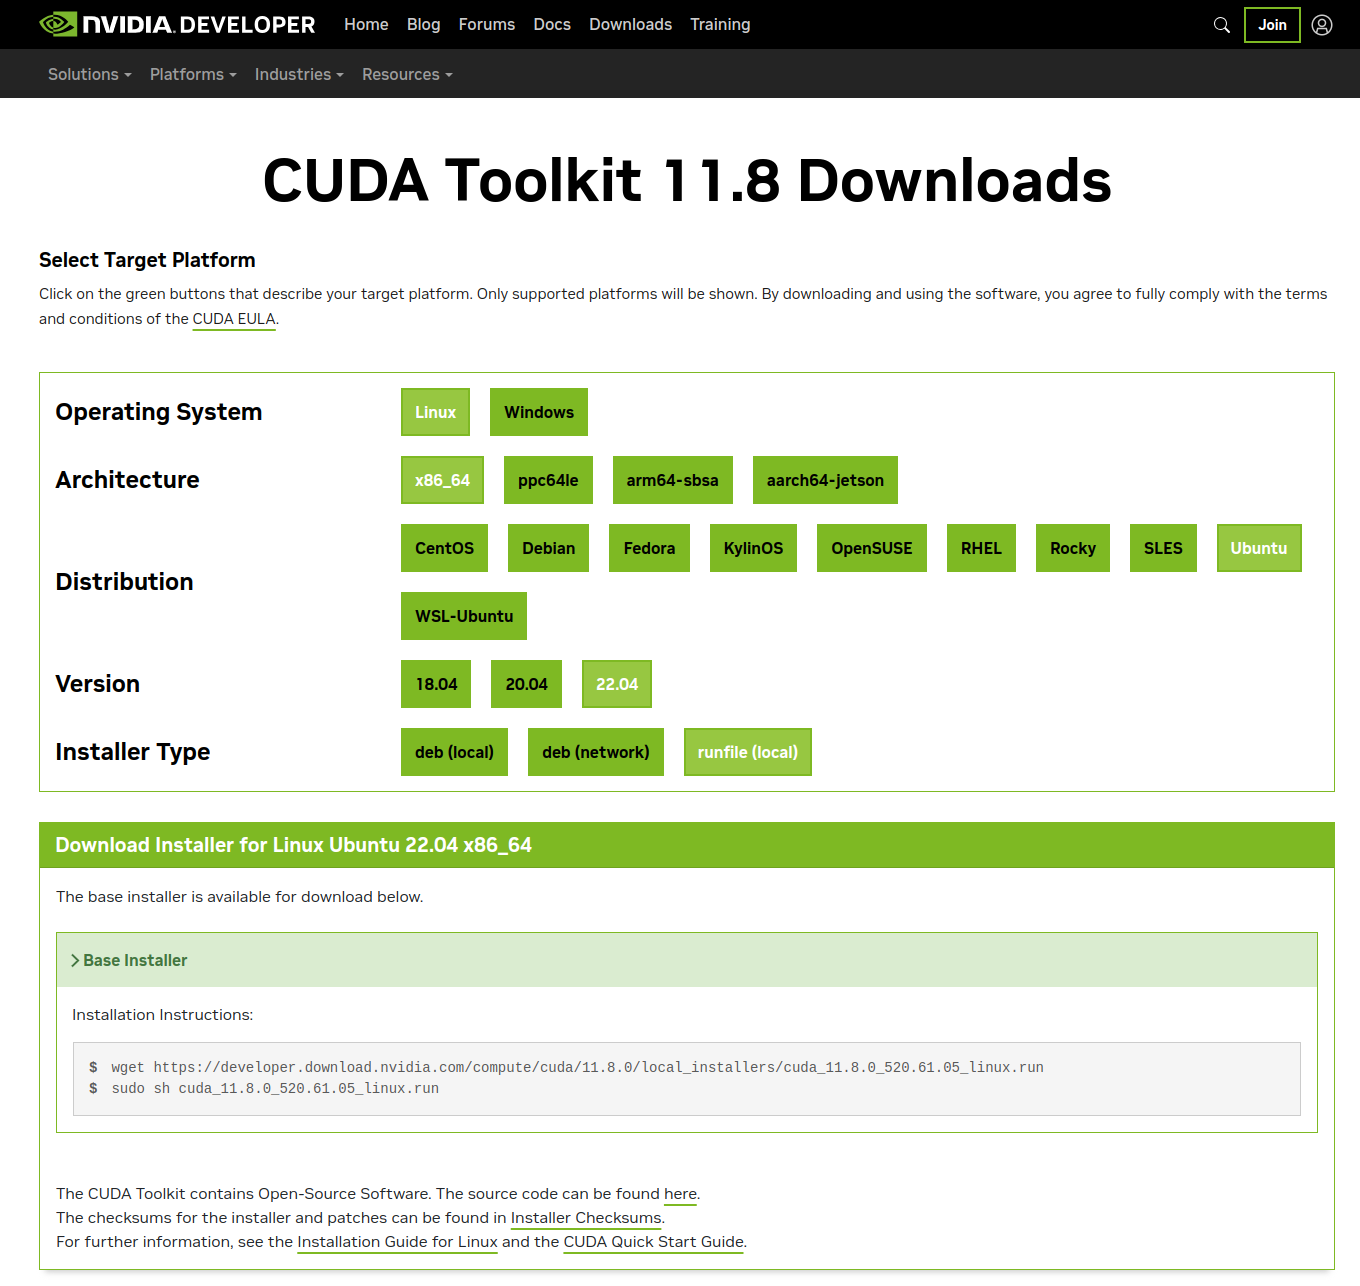
按文档提示安装即可:
wget https://developer.download.nvidia.com/compute/cuda/11.8.0/local_installers/cuda_11.8.0_520.61.05_linux.run
sudo sh cuda_11.8.0_520.61.05_linux.run
显卡驱动已安装的情况下,只选择安装cudnn,安装成功提示:
===========
= Summary =
===========

Driver:   Not Selected
Toolkit:  Installed in /usr/local/cuda-11.8/

Please make sure that
 -   PATH includes /usr/local/cuda-11.8/bin
 -   LD_LIBRARY_PATH includes /usr/local/cuda-11.8/lib64, or, add /usr/local/cuda-11.8/lib64 to /etc/ld.so.conf and run ldconfig as root

To uninstall the CUDA Toolkit, run cuda-uninstaller in /usr/local/cuda-11.8/bin
***WARNING: Incomplete installation! This installation did not install the CUDA Driver. A driver of version at least 520.00 is required for CUDA 11.8 functionality to work.
To install the driver using this installer, run the following command, replacing <CudaInstaller> with the name of this run file:
    sudo <CudaInstaller>.run --silent --driver

Logfile is /var/log/cuda-installer.log
按提示,加入环境变量(编辑 /etc/profile 追加):
export PATH=/usr/local/cuda-11.8/bin:$PATH
export LD_LIBRARY_PATH=/usr/local/cuda-11.8/lib64:$LD_LIBRARY_PATH
安装成功后,再安装 cuDNN ,官网下载 安装包后,安装:
$ sudo dpkg -i cudnn-local-repo-ubuntu2204-8.9.7.29_1.0-1_amd64.deb
[sudo] xiao 的密码:
正在选中未选择的软件包 cudnn-local-repo-ubuntu2204-8.9.7.29。
(正在读取数据库 ... 系统当前共安装有 223595 个文件和目录。)
准备解压 cudnn-local-repo-ubuntu2204-8.9.7.29_1.0-1_amd64.deb  ...
正在解压 cudnn-local-repo-ubuntu2204-8.9.7.29 (1.0-1) ...
正在设置 cudnn-local-repo-ubuntu2204-8.9.7.29 (1.0-1) ...

The public cudnn-local-repo-ubuntu2204-8.9.7.29 GPG key does not appear to be installed.
To install the key, run this command:
sudo cp /var/cudnn-local-repo-ubuntu2204-8.9.7.29/cudnn-local-8AE81B24-keyring.gpg /usr/share/keyrings/
最后重新安装 推理gpu模型框架库 onnxruntime-gpu :
pip uninstall onnxruntime onnxruntime-gpu
pip install -i https://pypi.tuna.tsinghua.edu.cn/simple onnxruntime-gpu==1.15.1
安装好后验证 onnxruntime 是否用到 GPU :
>>> import onnxruntime
>>> onnxruntime.get_device()
'GPU'  #表示GPU可用
>>> onnxruntime.get_available_providers()
['TensorrtExecutionProvider', 'CUDAExecutionProvider', 'CPUExecutionProvider']
还是有坑
所有都装好了,但还是无法使用 gpu ,
最后发现 onnxruntime-gpu, cuda, cudnn三者的版本要对应,否则会报错 或 不能使用 GPU 推理运算。
onnxruntime-gpu, cuda, cudnn版本对应关系, 详见: 官网
去官网发现果然不匹配,接着我尝试卸载、重装匹配的:
#卸载
$ sudo dpkg -r cudnn-local-repo-ubuntu2204-8.9.7.29 --purge
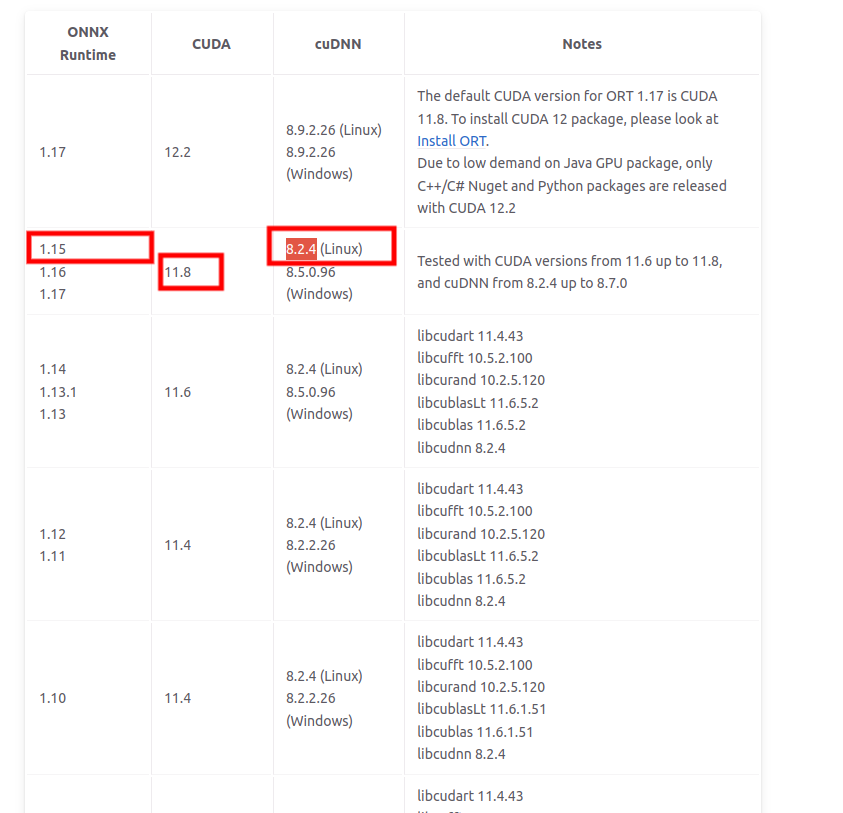
按那个匹配对应表 cuDNN 版本只能安装 8.2.4 版本,但是去 cuDNN ,官网 发现
cuDNN 8.2.4 版本没有 ubuntu22.04 系统的。。。

这个结果直接让我想吐血了!!!折腾了半天才发现我的 ubuntu 系统版本太高,如果要让 GPU跑起来只能把 ubuntu 系统版本降到 20.04,想想还是算了。。。
后续
虽然最终 roop 项目没有用上GPU 但让我发现了一个新的开源人脸识别算法,以后可能用到公司的项目中。另外,整个折腾的过程更加熟悉了基于英伟达 CUDA 的神经网络推理算法框架的搭建过程,也算是值得的。
后面又找到了另外一个 roop 的分支开源项目,可以在ubuntu22.04系统上让 GPU 算力发挥出来,并且功能更强大,还带 web ui 界面,如下截图:

算法处理后视频截图:
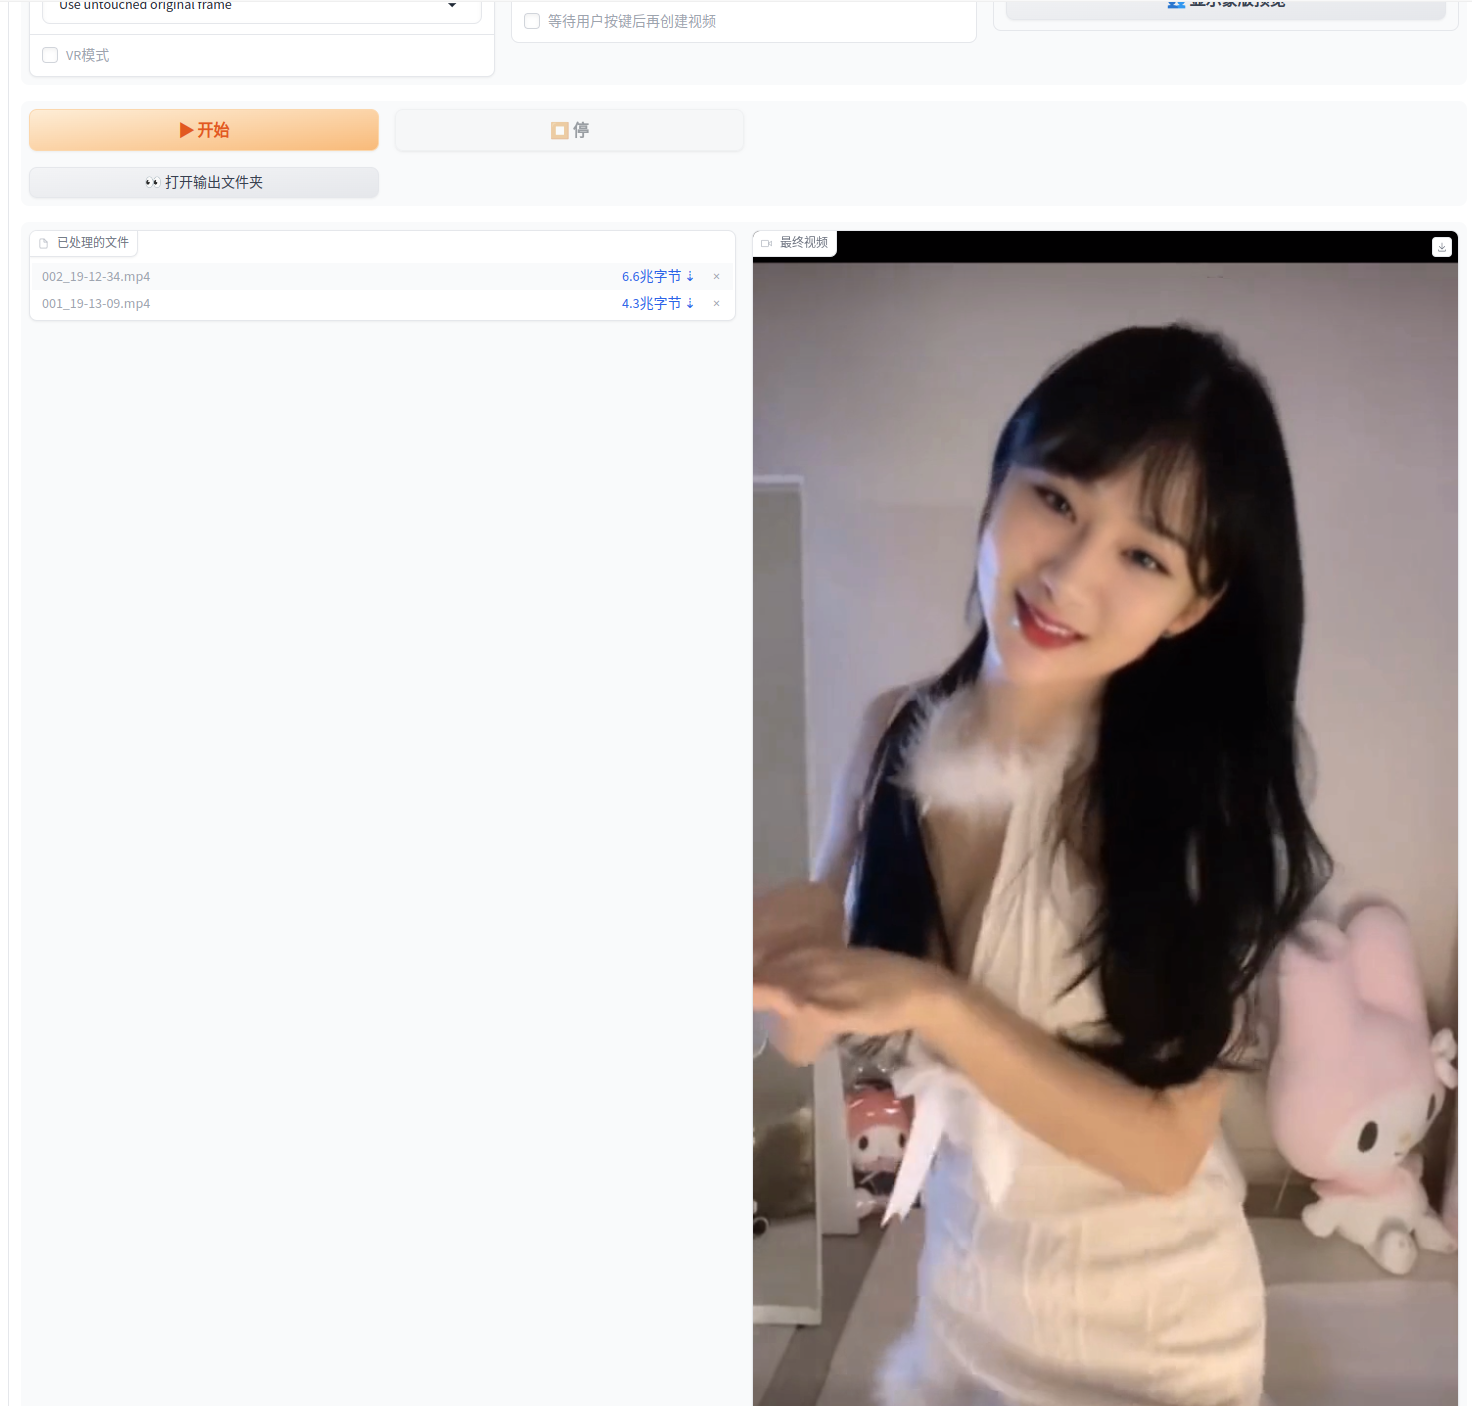
CPU 与 GPU 初步测试得出的结果还是很惊人的,同样一段视频处理 CPU 需要4分钟左右,而 GPU 只需要十几秒,大大提升了Ai创作的生产力。
查看视频处理时的 GPU 使用率,终于不是零了: